Configure an NFS Server with YAST tool
Configure an NFS Server with YaST:
To use YaST to configure the NFS server, start YaST and then select Network Services > NFS Server. You can also start the NFS Server module directly by entering in a terminal window as root yast2 nfs-server.
The following appears:
Select Start in the upper part of the dialog. The lower part is only active if the firewall is activated. In this case you can open the ports necessary for NFS by selecting Open Port in Firewall.
Continue by selecting Next. A Directories to Export dialog appears:

The following dialog appears:
Under Host Wild Card, this dialog lets you configure the host or hosts that should have access to the directory. You can define a single host, netgroups, wildcards, and IP networks.
Now you need to set permission options. The most commonly-used options include the following:
ro : File system is exported with read-only permission (default).
oot_squash : (Default) This ensures that the user root of the given machine does not have root permissions on this file system. This is achieved by assigning user ID 65534 to users with user ID 0 (root). This user ID should be set to nobody (which is the default).
no_root_squash : Does not assign user ID 65534 to user ID 0, keeping the root permissions valid
no_root_squash : Does not assign user ID 65534 to user ID 0, keeping the root permissions valid
Add further hosts, edit, or delete a host entry for a directory by selecting the directory; then select Add host, Edit, or Delete.When you finish, save the configuration by selecting Finish.
Configure NFS Client Access with YaST:
Configure NFS Client Access with YaST:
NFS directories exported on a server can be mounted into the file system tree of a client. The easiest way to do this is to use the YaST NFS Client module.
To use YaST to configure the NFS client, start the YaST Control Center and then select Network Services > NFS Client. You can also start the NFS Client module directly by entering in a terminal window as root yast2 nfs.
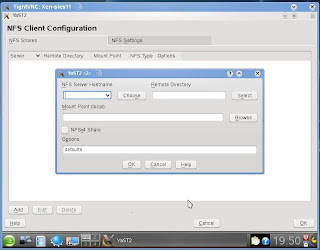
Add a directory to the list by selecting Add. The following appears:
In the Remote File System field, enter the exported directory on the NFS server you want to mount, or find and select the available directory by selecting Select.
In the Mount Point (local) field, enter the mountpoint in your local file tree to mount the exported directory, or browse to and select the mountpoint by selecting Browse.
When you finish configuring the directory, select OK. You are returned to the NFS client configuration dialog
Save the NFS client settings by selecting Finish. The settings are saved, services restarted, and the exported directories are mounted in your local file tree.


Most excelent, Thank you
ReplyDeleteI have been using samba on our SOHO network (some issues with KDE PIM crashing when making apointment changes across samba). As we have become more confortable with linux/openSUSE we hardly ever boot to windows. I have been reading about the NFS and came across your posting. Followed your examples & it works. The test will be tomorrow when I turn the network back on.
Thank you again
Ken
www.jkvetter.com & .net