Installation of Oracle 11g on SUSE Linux Enterprise Server 11
Required Software
i. SUSE Linux Enterprise Server 11
ii. Oracle Database 11g Release 1 (11.1) Enterprise/Standard Edition
Hardware Requirements:
The system must meet the following minimum hardware requirements:
i. RAM 1024 MB (Minimum)
ii. Swap space Approx. twice the size of RAM
iii. Disk space for software files 3.5 GB
iv. Disk space for database files 1.2 GB
Login on Linux System as Root user.
Before start the Oracle 11g Installation process on SLES-11 make sure the following things:
i. On linux System Oracle user must exist.
ii. On Linux system tow groups Oinstall and dba must exist
To verify Oracle user and groups Oinstall and dba on Linux system check following two configuration files.
i. passwd file for Oracle user confirmation. The passwd file is present in /etc directory, open passwd file through vi editor
etc/passwd
ii. group file for oinstall and dba groups confirmation. The group file is present in /etc/ directory, open group file through vi editor
/etc/group
4. In general, SLES-11 with default packages along with Oracle Server Base, and “C/C++ Compiler and Tools” is sufficient for Oracle 11g R1 install. Oracle Server Base selection provides orarun package. Here is screen-shot of selected patterns from SLES-11.
Novell SUSE Linux provides Orarun Package for Oracle Database installation.
The orarun Package configure the following settings:
i) It sets up a user oracle which is needed to run Oracle databases and creates two groups with the names dba and oinstall.
ii) It makes sure that typical Oracle environment parameters are set. These include ORACLE_BASE, ORACLE_HOME, PATH, LD_LIBRARY_PATH and others.
iii) It makes sure that kernel parameters are set.
7. Now we configure the Oracle user entry in /etc/passwd file because the account created by orarun package for oracle user is by default disabled. We must enable oracle user account. On terminal open passwd file through vi editor
vi /etc/passwd
i. Change the Oracle user location from "/opt/oracle" to "/home/oracle
ii. Change the shell for the "oracle" user from "/bin/false" to "/bin/bash
Set a new password for user “oracle”. Open terminal and write given below command
passwd oracle
Create oracle folder in /home directory
cd /home
mkdir oracle
Root user is the owner of oracle folder i.e. created in /home directory, now we change the ownership of oracle folder from root user to oracle user
# cd /home
# chown oracle oracle
Root group is the default group of the oracle folder i.e. created in /home director, now we change the group of oracle folder from root group to oinstall group
cd /home
chgrp oinstall oracle
In /home/oracle folder create .bash_profile file
cd /home/oracle
vi .bash_profile
In bash_profile declare and set some variables for oracle 11g database
ORACLE_BASE=/opt/oracle
ORACLE_HOME=$ORACLE_BASE/OraDB11g
ORACLE_OWNER=oracle
ORACLE_SID=ORCL
LD_LIBRARY_PATH=$ORACLE_HOME/lib:/lib:/usr/lib:/usr/local/lib
PATH=$ORACLE_HOME/bin:.:$PATH
export ORACLE_BASE
ORACLE_HOME ORACLE_OWNER ORACLE_SIDLD_LIBRARY_PATH PATH
Save and quit the .bash_profile with :wq command in vi editor
Now we change the ownership and group of .bash_profile file
chown oracle .bash_profile
chgrp oinstall .bash_profile
Change the permission of /home/oracle directory
cd /home
chmod 700 oracle
Change the permission of oracle folder i.e. is present in /opt directory
cd /opt
chmod 775 oracle
unzip Linux_11gR1_database package into /mnt directory through unzip command. After unzip a database folder is created in /mnt directory. Now we change the ownership and group of database directory in /mnt.
cd /mnt
chown –R oracle database
chgrp –R oinstall database
Now logout from Root user and login in the system through oracle user.
After login as oracle user we check/verify the environment variables and paths that above we set for oracle 11g database installation.
set |more
this command shows all environment variables
Now we move into /mnt/database folder and run the oracle 11g database runInstaller
cd /opt/database
runinstaller/.
Oracle Universal Installer will walk you through with self explanatory instructions. Here are screen-shots from simple Oracle 11g Installation:
Verify Oracle Installation Location
Verify oraInventory path
Here verify all prerequisite checks
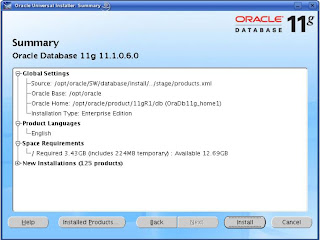
Review Oracle Database 11g Installation summary and click install
At the end of the installation process a dialog box appear that shows two scripts must run as root user before you further proceed. These scripts are orainstRoot.sh and root.sh. Open new termianl and login as root user and run these scripts.
Installation completed successfully


Comments
Post a Comment