Installation of SUSE Linux Enterprise Server 11
Installing SLES 11 consists of a base installation phase and a configuration phase.
To perform the base installation do the following:-
* Boot From the Installation Media
* Select the System Language, Keyboard Layout & License Agreement
* Select the Installation Mode
* Set the Clock and Time Zone
* Understand and Change the Installation Settings
* Verify Partitioning
* Select Software
* Start the Installation Process
Boot From the Installation Media
To start the installation process, insert the SUSE Linux Enterprise Server 11 DVD into the DVD drive and then reboot the computer to start the installation program. To start the installation program, your computer needs to be configured to start from a DVD drive. You might need to change the boot drive order in the BIOS setup of your system to boot from the drive.
When your system has started from the installation DVD, the following appears:

Select the Installation option to start the installation process.
Select the System Language, Keyboard Layout & License Agreement
 On the welcome Screen two drop down list appear, one for Language selection and second one for Keyboard Layout selection. Before you click on Next button accept the License Agreement of SLES-11.
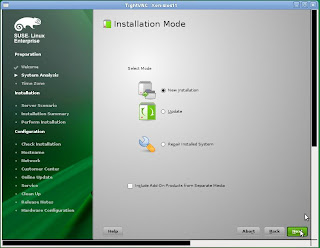
Select the Installation Mode
If there is no operating system installed on your computer, the installation mode dialog offers only New Installation. (Update and Other cannot be selected in this case.)
Select the System Language, Keyboard Layout & License Agreement
 On the welcome Screen two drop down list appear, one for Language selection and second one for Keyboard Layout selection. Before you click on Next button accept the License Agreement of SLES-11.
Select the Installation Mode
If there is no operating system installed on your computer, the installation mode dialog offers only New Installation. (Update and Other cannot be selected in this case.)

Set the Clock and Time Zone
selects the time zone of the installed system according to your language selection. Change the time zone if you are located in a different one.
 If your hardware clock is set to UTC (Universal Time Coordinated) the system time is set according to your time zone and automatically adjusted to daylight saving time. If your hardware clock is set to local time.
Understand and Change the Installation Settings
The proposed settings are displayed on two tabs, as in the following figure; Overview shows the main categories:
 The proposal displays installation settings that are necessary for a base installation. You can change these settings by selecting the following headings:
Keyboard layout. Changes the keyboard layout. YaST selects the keyboard layout according to your language settings. Change the keyboard settings if you prefer a different layout.
Partitioning. Changes the hard drive partitioning. If the automatically generated partitioning scheme does not fit your needs, you can change it by selecting this headline.
Software. Changes the software selection. You can select or deselect software.
Language. Changes the default language.
The Basic Linux Partitioning Scheme
The optimal partitioning scheme for a server depends on the purpose of the server.
A SLES 11 installation needs at least two partitions:
Swap partition. This partition is used by Linux to move unused data from the main memory to the hard dive, thus freeing main memory which then can be used by other processes.
Root partition. This is the partition that holds the top (/) of the file system hierarchy, the so-called root directory.
No matter what partition scheme you choose, you always need at least one swap partition and a root partition.
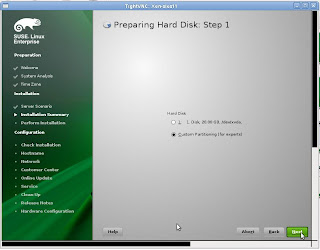
Select Custom Partition (for experts) and then click on next button
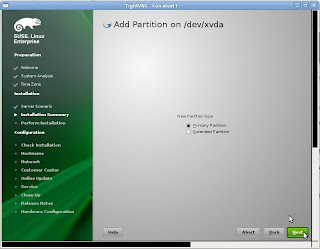
 Select the listed hard disk from the System view portion and then click on add buttion
Add the entire hard disk for linux use or give the custom size to linux OS
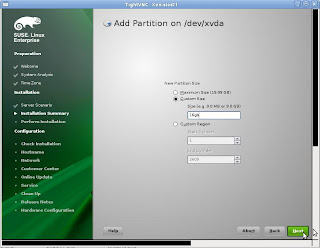
Create one partition for root (/) directory and assign ext3 file system for this partition
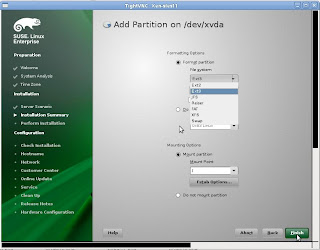
Create an other partition for Swap space and assign swap file system for this partition.

 Accept
Select Software:
 SLES 11 contains many software packages for various application purposes. Instead of selecting needed packages one by one, you can select various software categories.
Depending on the available disk space, YaST preselects several of these categories. Selecting Software in the installation overview opens the following dialog.
 To find out which packages are contained in the various categories, click on the details button. You can install a package by selecting the check box. Confirm your package selection and return to the installation proposal by selecting OK.
Start the Installation Process
After customizing the installation proposal, select Accept. A dialog appears asking you to confirm the proposal. Start the installation process by selecting Install; return to the installation proposal by selecting Back.
Before installing software packages, YaST changes the hard disk partitioning.
Depending on your software selection and the performance of your system, the installation process takes 15–45 minutes.
After all software packages are installed, YaST reboots the computer and prompts you for the hostname, root password, network configuration details, etc., to further customize your installation.
 Enjoy
Enjoy
selects the time zone of the installed system according to your language selection. Change the time zone if you are located in a different one.
 If your hardware clock is set to UTC (Universal Time Coordinated) the system time is set according to your time zone and automatically adjusted to daylight saving time. If your hardware clock is set to local time.
Understand and Change the Installation Settings

The proposed settings are displayed on two tabs, as in the following figure; Overview shows the main categories:
 The proposal displays installation settings that are necessary for a base installation. You can change these settings by selecting the following headings:
Keyboard layout. Changes the keyboard layout. YaST selects the keyboard layout according to your language settings. Change the keyboard settings if you prefer a different layout.
Partitioning. Changes the hard drive partitioning. If the automatically generated partitioning scheme does not fit your needs, you can change it by selecting this headline.
Software. Changes the software selection. You can select or deselect software.
Language. Changes the default language.
The Basic Linux Partitioning Scheme
The optimal partitioning scheme for a server depends on the purpose of the server.
A SLES 11 installation needs at least two partitions:
Swap partition. This partition is used by Linux to move unused data from the main memory to the hard dive, thus freeing main memory which then can be used by other processes.
Root partition. This is the partition that holds the top (/) of the file system hierarchy, the so-called root directory.
No matter what partition scheme you choose, you always need at least one swap partition and a root partition.

Select Custom Partition (for experts) and then click on next button
 Select the listed hard disk from the System view portion and then click on add buttion
Add the entire hard disk for linux use or give the custom size to linux OS

Create one partition for root (/) directory and assign ext3 file system for this partition

Create an other partition for Swap space and assign swap file system for this partition.

 Accept
Select Software:
 SLES 11 contains many software packages for various application purposes. Instead of selecting needed packages one by one, you can select various software categories.
Depending on the available disk space, YaST preselects several of these categories. Selecting Software in the installation overview opens the following dialog.
 To find out which packages are contained in the various categories, click on the details button. You can install a package by selecting the check box. Confirm your package selection and return to the installation proposal by selecting OK.
Start the Installation Process
After customizing the installation proposal, select Accept. A dialog appears asking you to confirm the proposal. Start the installation process by selecting Install; return to the installation proposal by selecting Back.
Before installing software packages, YaST changes the hard disk partitioning.
Depending on your software selection and the performance of your system, the installation process takes 15–45 minutes.
After all software packages are installed, YaST reboots the computer and prompts you for the hostname, root password, network configuration details, etc., to further customize your installation.
 Enjoy
Enjoy


yurtdışı kargo
ReplyDeleteresimli magnet
instagram takipçi satın al
yurtdışı kargo
sms onay
dijital kartvizit
dijital kartvizit
https://nobetci-eczane.org/
BDWB
Hollanda yurtdışı kargo
ReplyDeleteİrlanda yurtdışı kargo
İspanya yurtdışı kargo
İtalya yurtdışı kargo
Letonya yurtdışı kargo
1UKDİ
Portekiz yurtdışı kargo
ReplyDeleteRomanya yurtdışı kargo
Slovakya yurtdışı kargo
Slovenya yurtdışı kargo
İngiltere yurtdışı kargo
1MTR5
Angila yurtdışı kargo
ReplyDeleteAndora yurtdışı kargo
Arnavutluk yurtdışı kargo
Arjantin yurtdışı kargo
Antigua ve Barbuda yurtdışı kargo
AUGDRX