Configure Weblogic Domain for WebCenter Sites 11g
In this post we will configure and set some setting in Weblogic domain (csDomain) before we start the installation of Oracle WebCenter Sites on Windows 7.
Setting Hostname Verification for AdminServer
1) Start Weblogic Server, after the admin server has started, open a web browser and log in to the “WebLogic Server Administration Console” at: http://localhost:7001/console
2) In the tree at the left of the screen, expand Environment.
3) Click Servers.
4) Click on the AdminServer.
5) Click the Configuration tab.
6) Click SSL.
7) Click Advanced.
8) Click Save
In the “Hostname Verification” drop-down menu, select None.
Enabling Tunneling for AdminServer
1) Expand Environment on the left hand side.
2) Click AdminServers.
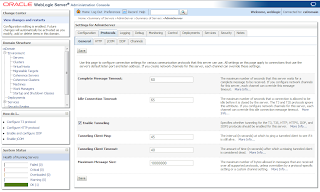
3) Click the Protocols tab.
4) Click the Enable Tunneling check box.
5) Click Save
Setting the Max PermGen Parameter
Edit the setDomainEnv.cmd file located in the <domain_home>/bin directory. change this parameter to one of the following:
• MEM_PERM_SIZE_32BIT=“–XX:PermSize=<desired_permgen_size> or
• MEM_PERM_SIZE_64BIT=“–XX:PermSize=<desired_permgen_size>
to
• MEM_PERM_SIZE_32BIT=“–XX:PermSize=192m or
• MEM_PERM_SIZE_64BIT=“–XX:PermSize=192m
Setting JAVA_OPTIONS for WebCenter Sites in Windows 7
Edit <domain_home>/bin/startWebLogic.cmd and add JAVA_OPTIONS for the following:
set JAVA_OPTIONS=-Djava.io.tmpdir=<domain_home>\user_projects\domains\base_domain\servers\AdminServer\tmp -Dfile.encoding=UTF-8 -Dnet.sf.ehcache.enableShutdownHook=true -Djava.net.preferIPv4Stack=true %JAVA_OPTIONS%
Setting CLASSPATH and PRE_CLASSPATH for WebCenter Sites in Windows 7
Edit <domain_home>/bin/startWebLogic.cmd and add following
set CLASSPATH=<WebCenter Sites Installation Directory>\bin %CLASSPATH%
For the WebCenter Sites Contributor interface to load properly, edit the setDomainEnv.cmd and add following
SET PRE_CLASSPATH=<Middleware_Home>\user_projects\domains\csDomain\CS\WEB-INF\lib\commons-lang-2.4.jar %PRE_CLASSPATH%
In the next post we will Creating and Configuring a Data Source in Weblogic Server for WebCenter Sites installation.


Comments
Post a Comment