Posts

Showing posts from April, 2012

Create Entity Object for Oracle ADF Components Layer in Application

Image
Lets look how we accutaly built Oracle ADF Components layer for our application. The first step is usually creating Entity Objects and this involves following steps. 1) Mapping to database tables 2) Choosing specific attributes 3) Set attribute properties Start Oracle JDeveloper, Click on New Application and from Categories select Application and from Item select Fusion Web Application (ADF)

Oracle ADF Business Components

Oracle ADF Business Components is part of the Oracle ADF framework that is responsible for simplifying the way that we build  Java EE based business services that interact with database it focus on delivering familiar development approach for developers who are comming from the 4 Generation Lanugage tools such as Oracle Forms, Powerbuilder or Visiual Basic and its provide very declarative approach to creating those business services and relational databases. In funcianility Oracle ADF bussiness component is responsible for simplifing the way that we access the data. It also simplifies the way that we write business logic on top of this data. It uses SQL is the way to define the views of the data that we getting. Its separate actual data views from business logic and perform validation in our application. It is also easy to customize it. ADF Business components consist of three layers 1) Entitiy Objects and Associations 2) View Objects and View Link 3) Application M

Call Oracle Stored Procedure using JDBC CallableStatement

Calling stored procedure is same as calling stored function as mentioned in previous post. In this example we will perform INSERT, UPDATE, DELETE on Account table. Code snippets to show you how to call a Oracle stored procedure via JDBC   CallableStatement , and how to pass IN parameters from Java to stored procedure. 1) Stored Procedure A stored procedure in Oracle database. Later, calls it via JDBC. create or replace procedure spAccount(p_acode number,p_aname varchar, p_obalance number,p_descflag varchar) IS begin --INSERTING METHOD IF p_descflag = 'I' THEN insert into account values (p_acode,p_aname,p_obalance); END IF; --UPDATING METHOD IF p_descflag = 'U' THEN update account aa set aa.acct_name = p_aname, aa.obalance = p_obalance where aa.acct_code = p_acode; END IF; --UPDATING METHOD IF p_descflag = 'D' THEN delete from account aa where aa.acct_code = p_acode; END IF; commit; end spAccount;

Call Oracle Stored Function using CallableStatement through Oracle JDBC Pool Recource

The Oracle PL/SQL language allows you to write functions and procedure to centralize the business logic and store the code in the database. This business logic may be call in many different ways including from a Glassfish Server's JDBC Pool Connection Resource. There are five steps involved in calling a PL/SQL Function from within a application: Create and prepare a JDBC CallableStatement object that contains a call to your PL/SQL function. Register the output parameter for your PL/SQL function. Provide all of the required parameter values to your PL/SQL function. Call the execute() method for your CallableStatement object, which then performs the call to your PL/SQL procedure. Read the returned value from your PL/SQL function.

Retrive Records through PreparedStatement using Oracle JDBC Pool Resource

Image
In this post i will show you to how to select data from database through PreparedStatement using Oracle JDBC Pool Resource. In this example we are selecting all records from Users table and using WHILE LOOP shows all records into browser. 1) Create JSP page using Netbean IDE. 2) Add following classes in your JSP page. <%@page import="java.sql.ResultSet"%> <%@page import="java.sql.PreparedStatement"% > <%@page import="java.sql.SQLException"%& > <%@page import="java.sql.Connection"% > <%@page import="javax.sql.DataSource"% > <%@page import="javax.naming.InitialContext"%> 3) Add the following code in body tag. This code contain JDBC Pool Resource connection, plain SQL Statement and PreparedStatement. <% InitialContext ctx = new InitialContext(); DataSource ODS = (DataSource) ctx.lookup("jdbc/__oracon"); Connection CN = ODS.getConnection(); if (CN == null) { throw new SQLExcepti

How to use JDBC Connection Pool Resource in Java Application

Image
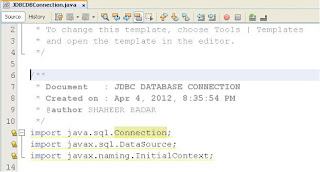
In the previous post we created a JDBC Pool Resource and now in this post i will show you that how to use JDBC connection pool resource your Java Application. 1) Import following Classes in your application. import java.sql.Connection; import javax.sql.DataSource; import javax.naming.InitialContext; 2) Create a JDBCconnection Class as mentioned public class JDBCconnection(){ private DataSource ODS; private Connection CN; public JDBCconnection(){ try { InitialContext ctx = new InitialContext(); /*jdbc/__oracon is a pooled resource name*/ ODS = (javax.sql.DataSource) ctx.lookup("jdbc/__oracon"); CN = ODS.getConnection(); if (CN== null){ System.out.println("Error occur while establishing connection"); } } catch (Exception e){ System.out.println("Oops! " + e.getMessage()); } } } Now using the Connection CN you can call both PreparedStatement Or CallableStatement to write SQL statement directly in your code or call Stored Function, Procedures etc.

How to create a JDBC Resource using JDBC Connection Pool

Image
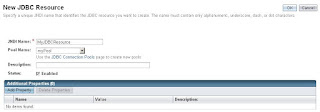
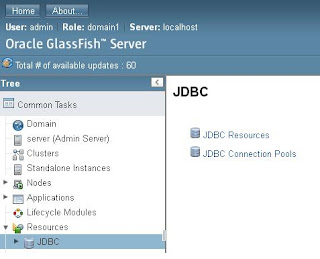
In the previous post I have created an Oracle JDBC Connection Pool using Glassfish 3.1 and in this post I will show you how to add JDBC Connection Pool into JDBC Resource. 1) On the left pane, click on Resources → JDBC → JDBC Resources 2) Click on the “New” button to add a new JDBC resource. In the resulting form, type in MyJDBCResource for JNDI Name. For the Pool Name, select myPool. Leave the rest as default and click OK. 3) You should see that your resource has created. Now your JDBC Resource is ready to use into your web application.

Create Oracle Database Pool in GlassFish 3.1

Image
To create an Oracle Datasource Pool in Glassfish, follow these steps 1. Copy the Oracle JDBC drivers (i.e. ojdbc6 in my case) to \glassfish\glassfish\domains\domain1\lib\ext directory. domain1 name may be changed according to your setting. 2. Start Glassfish. 3. Login to the admin interface and create a JDBC Connection Pool. 4) Enter the Pool name, Resource Type and Database Driver Vendor. Click next to proceed 5) In General Setting check the ping enabled property. 6) Instead of following mention properties, delete all the others properties. user - set this to Oracle userid password - set this to Oracle password URL - set this to the URL, example jdbc:oracle:thin:@localhost:1521:SID 7) After doing all setting click on finish and ping succeeded message will appear on the top of the page. Finally add your Pool into JDBC Resources and after that your DataSource is ready to use.

Installation of Oracle GlassFish Server 3.1

Image
Oracle GlassFish Server is the worlds first implementation of the Java Platform, Enterprise Edition (Java EE) 6 specification. Built using the GlassFish Server Open Source Edition, Oracle GlassFish Server delivers a flexible, lightweight and production ready Java EE 6 platform. In this post i will show you to how install Oracle GlassFish Sever 3.1 1) Run the ogs-3.1-windows setup file 2) After read the introduction, Choose the installation type 3) Select the installation directory 4) The option Update Tool periodically checks GlassFish Server updates 5) After ready to install, installation in progress 6) After installation configuration will start. Configuration like Domain Creation, Configure Admin, HTTP, JMS etc ports. Finally the GlassFish Server is installed and ready to use.